
Drupal 8 Front-End Architecture
I recently read Front-End Architecture for Design Systems by Micah Godbolt (BK1). It is a fantastic evaluation of front-end architecture and strategy. The book isn’t specifically for Drupal developers, but the concepts laid out in the book are relevant to all front-end developers and they are easily applicable to Drupal 8 projects. In this post, I want to build a couple of components and discuss different front-end architecture approaches for Drupal 8 projects, specifically using the concepts in Godbolt’s book.
Modular Content
The concept of atomic design (often referred to as component-driven design), popularized by Brad Frost (BP5), has become a very popular approach to front-end architecture because it strongly reinforces DRY principles, it makes it much easier for front-end teams to collaborate without conflicts, allows your front-end team to be more agile and, when paired with a living styleguide, your back-end team and front-end team can work simultaneously with far less concern of conflict. For those of us on very small teams, you might all be full-stack developers out of necessity, but I think that this approach can still be advantageous, but ultimately that should be decided during the discovery/early phase of a project.
Atomic design is all about breaking down design into the smallest components and building larger and larger components from those smaller components until you have a complete webpage. In Drupal 8, you can fully customize/create your own HTML markup for your components (BP18). Furthermore, you can use a unique class for each component and apply all of your styles for that component to that unique class (BAD4). This approach has some great advantages, like keeping HTML elements out of CSS selectors, avoiding nesting and ambiguity in CSS/SCSS, and, I feel, it forces you to write more modular CSS.
I’m going to demonstrate how you could build a staff listing page throughout this post. I am going to use Phase 2’s pattern-lab-starter theme (THE4) since I’m already familiar with it and I think it is a great choice. In each section, I will try to only demonstrate the pieces relevant to that section. I hope by the end of the post, you will understand what goes into building a component, how to use existing components to create larger components, the advantages to a component-based approach, and some of the options you have to implement a component-based approach.
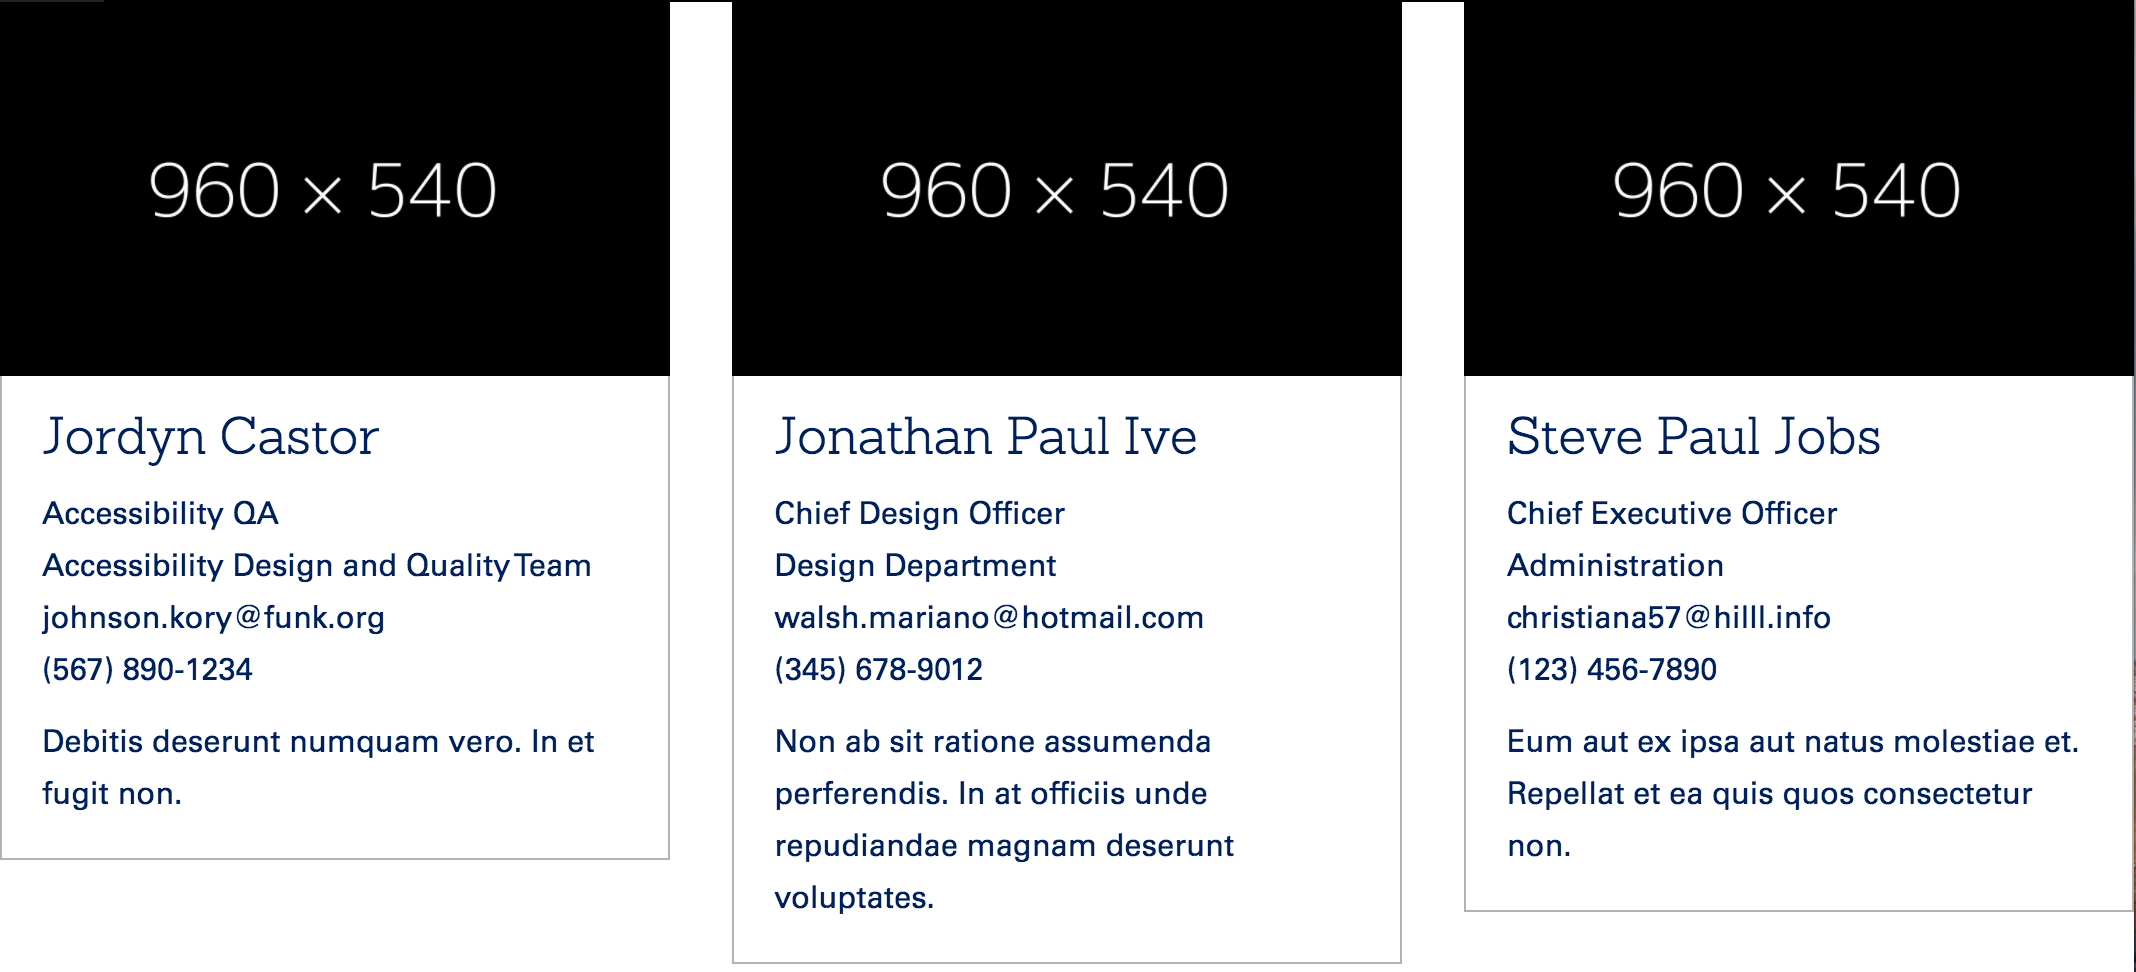
Here is an example of the completed staff listing component (medium up viewport).
Twig
Drupal 8 uses Twig as its templating language (CR13), like Drupal 7 used PHPTemplate (CR16). I won’t go to much into Twig here, but it is important (as always) to write semantic markup. There are plenty of good resources available to learn and refine your Twig skills, whether it be Drupal-specific or not (BP15) (BP16).
It is very important to write modular Twig files, I suggest one file per component, so that you can build bigger components using Twig’s include and embed. There are some good ‘starter’ examples of modular Twig components in the open source, component-based Drupal 8 themes (THE1) (THE2) (THE3) (THE4) (THE5).
Lets consider the staff listing example I mentioned earlier. What we will do, is build the Twig template for a single staff member, and then we will use that template to generate the grid of staff members that you saw in the screenshot above.
So, here is the Twig template that we will use for a single staff member:
staff.twig
<figure{{ attributes.addClass("staff", theme) }}>
  <div class="staff__img-container"><img class="staff__img" src="{{ img.landscape }}" alt=""></div>
  <figcaption class="staff__caption">
  {% if name %}<h3 class="staff__name">{{ name.first ~ " " ~ name.middle ~ " " ~ name.last }}</h3>{% endif %}
    <div class="staff__meta">
      <p class="staff__position">{{ position }}</p>
      <p class="staff__department">{{ department }}</p>
      <p class="staff__email">{{ email }}</p>
      <p class="staff__phone">{{ phone }}</p>
    </div>
    <div class="staff__body">
      {% block body %}
        <p class="staff__bio">{{ excerpt.medium }}</p>
      {% endblock %}
    </div>
  </figcaption>
</figure>
I’m not going to go into great detail about this markup yet, but note that this represents the entire markup for a component. Every instance of this ‘staff’ component will use this exact markup everywhere that it is displayed. Also, please note that I am not involving Drupal in any way at this point. Just consider this as a stand-alone Twig file for now. I will discuss how Drupal becomes involved later.
staff–dark.twig
I’m going to create a “dark theme” of the Staff component also, which is really easy now that we have staff.twig.
{% include "@molecules/staff/staff.twig" with {'theme': 'staff--dark'} %}This is a pretty trivial example of a variation of an existing component, but I want to show some example of how you can do this. This “dark theme” will just change the background color and text color.
Here is the Twig template that we will use to produce the grid of staff members that I showed you in the screenshot above.
staff-grid-block.twig
{% embed "@base/grids/_smart-grid.twig" with {
  rowItems: {
    medium: 3
  }
} %}
  {% block gridItems %}

    {% for s in staff %}
      {% embed "@molecules/staff/staff.twig" with {
        img: {
          landscape: s.img.landscape
        },
        name: {
          first: s.name.first,
          middle: s.name.middle,
          last: s.name.last
        },
        position: s.position,
        department: s.department,
        email: s.email,
        phone: s.phone,
        excerpt: {
          medium: s.excerpt
        },
        theme: s.theme
      } %}
      {% endembed %}
    {% endfor %}

  {% endblock %}
{% endembed %}
There are some Twig components in this code snippet that you probably aren’t familiar with because they are defined in Phase2’s pattern-lab-starter. So, lets walk through it.
We start off by embedding a Twig template called _smart-grid.twig, and we pass the embed rowItems: { medium: 3 }. If you are not familiar with Twig’s embed tag, I highly recommend you review the Twig embed docs. So, before explaining what’s going on technically, it is important that you know that this entire Twig template is just saying, “Use the staff.twig Twig template we just created to make a grid of staff members. For a medium-up viewport, it will be a horizontal grid with 3 staff members per row, otherwise, it will stack them vertically.” I am obviously ignoring some of the details, but that is essentially what is happening. Now lets talk about how/why.
So, here is what’s happening:
1. embed the _smart-grid.twig file (I will discuss the “@base/grids/” part later)
_smart-grid.twig is a file given to you in Phase2’s patter-lab-starter. Lets take a look at what’s going on in it:
_smart-grid.twig
<div class="smart-grid

  {%- if classes %} {{ classes }}{% endif -%}
  {%- if demoItems %} grid-demo{% endif -%}"
  {%- if rowItems.small %}data-row-items-small="{{ rowItems.small }}"{% endif -%}
  {%- if rowItems.medium %}data-row-items-medium="{{ rowItems.medium }}"{% endif -%}
  {%- if rowItems.large %}data-row-items-large="{{ rowItems.large}}"{% endif -%}
  {%- if rowItems.xlarge %}data-row-items-xlarge="{{ rowItems.xlarge }}"{% endif -%}
>
  {% block gridItems %}
    {% if demoItems %}
      {% set items = 1..demoItems %}
    {% endif %}
    {% for item in items %}
      <div></div>
    {% endfor %}
  {% endblock %}

</div>
2. pass it the rowItems parameter
First, take a look at the rowItems.small down to rowItems.xlarge lines. These are the lines that will handle the “For a medium-up viewport, it will be a horizontal grid with 3 staff members per row, otherwise, it will stack them vertically.” part that I discussed a couple paragraphs ago. Since we are passing rowItems: { medium: 3 }, you can see that if rowItems.medium will be true. So, our first html element will be <div class="smart-grid" data-row-items-medium="3">.
3. override the gridItems block
Moving down to {% block gridItems %}. Twig blocks are important for inheritance (http://twig.sensiolabs.org/doc/tags/extends.html). In this staff listing example, the staff-grid-block.twig is a child template to the _smart-grid.twig template since we embed the _smart-grid.twig template in the staff-grid-block.twig template. So, in our child template, we are ‘filling in’ the block(s) defined in the embedded template. That is exactly what is happening in our example. You can ignore all of the content within the gridItems block in _smart-grid.twig for now because we do not pass demoItems or items in this example, so we will just be filling in that block with the content we pass in.
4. for each s in staff put a staff member into the grid using staff.twig, and pass each parameter from each staff member s to the staff.twig file
This one is pretty simple now that we’ve covered how embed works. I know that you might be wondering where the staff variables is coming from in the for loop. I will talk more later about how to populate the staff variable with data. It is much easier to talk about it once we start talking about PatternLab and how the Twig templates in PatterLab can be used in Drupal.
staff-grid-block–dark.twig
We could also create a “dark theme” version of the staff-grid-block.twig file. You could just replace theme: s.theme for theme: "staff--dark". NOTE: I haven’t demonstrated how to include PatternLab templates in Drupal .html.twig files, but it is important to note that you wouldn’t include this particular PatternLab template in one of your Drupal .html.twig template files. Instead, you would include staff-grid-block.twig and pass the staff variable where theme is set to “staff–dark” for s in staff. This promotes DRY. So, I am creating this staff-grid-block–dark.twig file simply for the purpose of viewing it in PatternLab.
{% embed "@base/grids/_smart-grid.twig" with {
  rowItems: {
    medium: 3
  }
} %}
  {% block gridItems %}

    {% for s in staff %}
      {% embed "@molecules/staff/staff.twig" with {
        img: {
          landscape: s.img.landscape
        },
        name: {
          first: s.name.first,
          middle: s.name.middle,
          last: s.name.last
        },
        position: s.position,
        department: s.department,
        email: s.email,
        phone: s.phone,
        excerpt: {
          medium: s.excerpt
        },
        theme: "staff--dark"
      } %}
      {% endembed %}
    {% endfor %}

  {% endblock %}
{% endembed %}
CSS Methodologies
Lets take a look at what the SCSS looks like. If you haven’t used BEM (Block Element Modifier), you can read/listen/watch about them using these resources (BP24) (BAD4). Very briefly, BEM is a CSS methodology that is great for efficiently organized styles. Generally speaking, it is very effective on larger, more complex projects because of its strict organization of code. In the chunk of code below, staff will be our ‘block’, each of the __* will be the blocks.
BEM
staff.scss
.staff {
  margin: 0;

  &__caption {
    padding: $spacing--l;
    border-left: 1px solid $c-gray;
    border-right: 1px solid $c-gray;
    border-bottom: 1px solid $c-gray;
  }

  &__name {
    margin: 0 0 $spacing--m 0;
  }

  &__meta {
    margin-bottom: $spacing--m;
  }

  &__position,
  &__department,
  &__email,
  &__phone {
    margin-bottom: 0;
  }

}
.staff--dark {
  .staff__caption {
    background: black;
    color: white;
    border-left: none;
    border-right: none;
    border-bottom: none;
  }
}
Exhausted Documentation (Styleguides)
Living styleguides, like PatternLab and KSSNode, have become a popular topic in the Drupal community with the adoption of Twig and projects like Component Libraries module (MOD3) that provide a relatively seamless pairing of your Drupal 8 site and your styleguide. Living styleguides are very helpful in implementing an Agile workflow on front-end teams. You can constantly work on individual components, ‘always be shipping’, and be in constant communication/feedback with clients. Furthermore, when used properly, these living styleguides leave very comprehensive front-end/design documentation for clients and your own team.
PatternLab provides you with a directory structure/hierarchy for your patterns. You can view a demo on their website. So, you can see that the patterns are organized into top level categories: atoms, molecules, organisms, templates and pages. You start by building atoms, then use those to form molecules, then organisms, etc. you get the idea. So, lets continue with our staff listing example.
Here are the staff listing related files we’ve created so far:
- staff.twig
- staff–dark.twig
- _staff.scss
- staff-grid-block.twig
In PatternLab, lets create a Staff molecule and a Staff Grid Block organism. First, we can create a staff directory in our molecule directory source/_patterns/02-molecules to contain our staff.twig, staff--dark.twig and _staff.scss files. Obviously, you can mkdir and touch to create the directory and files, but Phase2 has a nifty Yeoman script in their pattern-lab-starter repo (THE4), aliases as npm run new, that will do everything for you (See: ./scripts/new-component/index.js)! So, create both the Staff molecule and Staff Grid Block organism. We need a .twig and .scss file for the Staff molecule and only a .twig file for the Staff Grid Block organism. Also, move all the source code into the files you just created.
After just issuing that npm/yeoman command and putting the code into these files, look at what we have accomplished!
staff
staff–dark
staff-grid-block
staff-grid-block–dark
At this point, you can see each of these components in their entirety without even touching Drupal! If you’re doing client work, this is a great way to demonstrate design/front-end functionality to your clients without having to even involve backend development or ‘site-building’ at all. Clients could approve an entire design/website before a backend developer even creates a content type, paragraph type or whatever else. This means that backend developers don’t have to go back and change data structures if clients completely change their mind once they see a design.
This is also great for front-end developers though! Front-end developers hate having to fuss with Drupal-isms while creating their designs, and now they barely have to. (MortenDK) lol
“Obviously I’m being sarcastic – but not that sarcastic, to be honest with you”
PEOTUS
Comprehensive Testing
Performance Testing
This section of Godbolt’s book was pretty enlightening for me. Having worked entirely in HigherEd and on a small team, I haven’t had a project with an explicit ‘perfbudget’. We obviously check the performance of our sites, but we’ve never looked into automating performance tests.
Godbolt uses Grunt in his book, so he suggests these two Grunt packages for automating performance tests: grunt-pagespeed and grunt-perfbudget. I am more of a Gulp man myself, and I was already rolling Gulp on the d8 test site I was using to follow along. So, that being said, I did not try either of those Grunt packages. Instead, I tried gulp-sitespeedio.
The gulp-sitespeedio plugin was incredibly easy to install, configure and use, which is exactly what I was looking for as a n00b to automated performance testing. The brief Getting Started on the repo is seriously all you need to get started. Just run this to install it:
npm install gulp-sitespeedio --save-devHere is what I added to my gulpfile.js:
var sitespeedio = require('gulp-sitespeedio');tasks.default.push(sitespeedio({
urls: ["http://d8.dev/"],
outputFolder: 'sitespeedio'
})
);And here is the output I got when Gulp ran the task (you can click on the image to see a larger image of the output):

Wait, wasn’t this supposed to be about Drupal?
So, now we have everything and it’s awesome, but we haven’t even touched Drupal.
I’m going to start by creating some Paragraph Types (MOD2). If you haven’t used Paragraphs yet, I highly suggest it. It is a great module for creating flexible, re-useable pieces of content. It also provides a really phenomenal experience for site-builders and anyone who creates and/or edits content.
Staff
Build paragraph type in admin interface
I’m not going to go too far into how to use the Paragraphs module in this post because this post is already 10 times longer than I intended and there are plenty of good resources on Paragraphs (I’ll try to put some in my Sources section below).
Download and enable the paragraphs module, go to Structure > Paragraph Types and click “+ Add paragraph type”. Adding fields should be familiar to anyone with previous Drupal sitebuilding experience. I’m going add a screenshot of my completed paragraph type here so you can follow along.
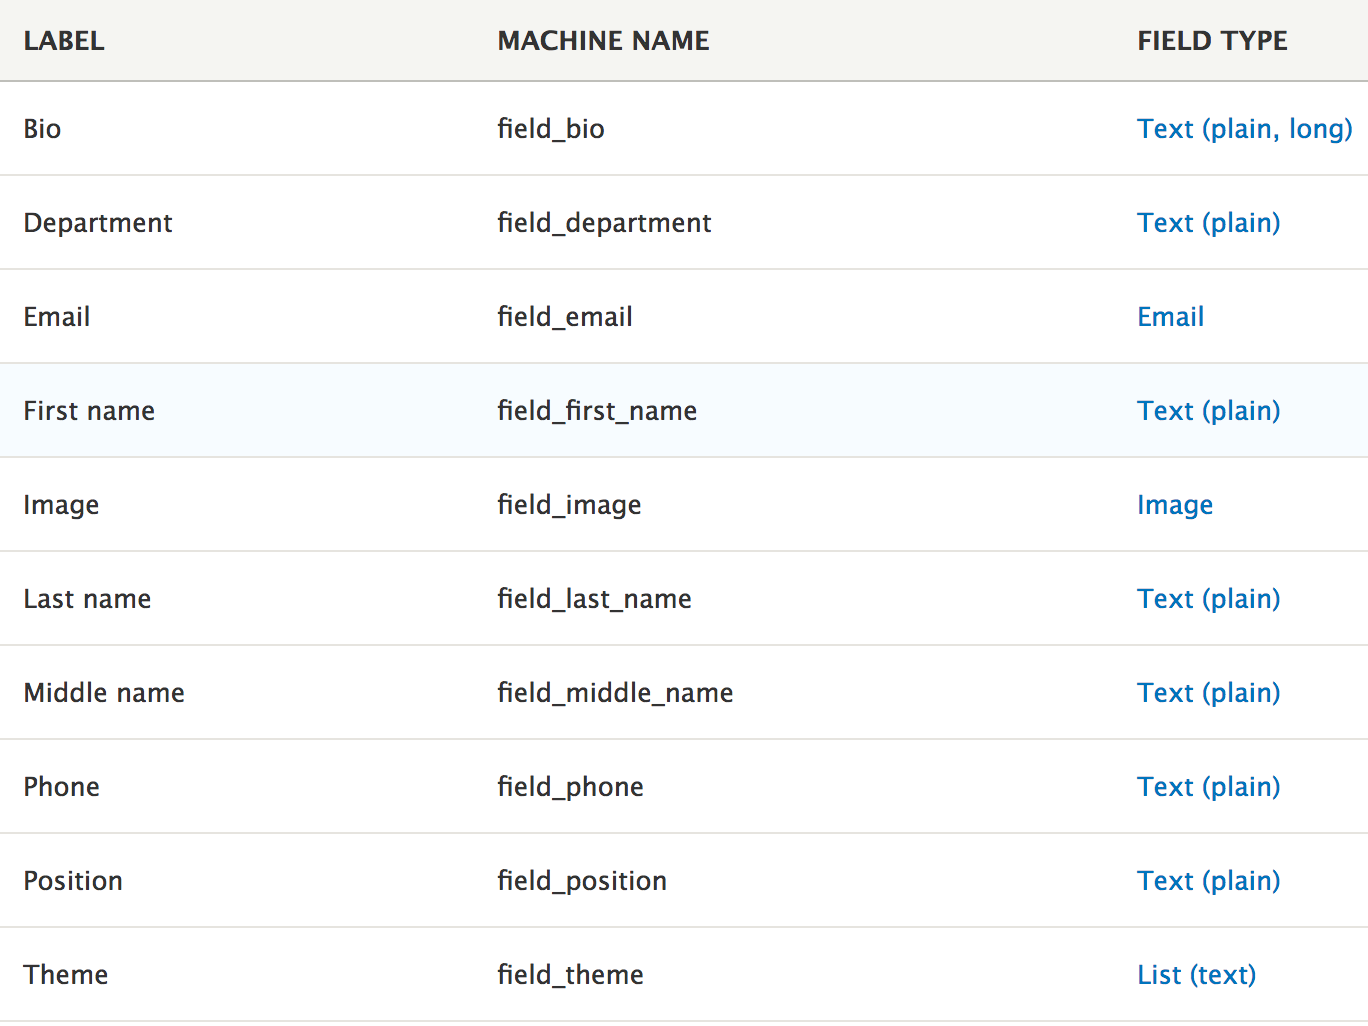
Create .twig file
This file, paragraph--staff.html.twig will go in your themes /template directory.
{%
  include "@molecules/staff/staff.twig" with {
    "theme": "staff--" ~ content.field_theme['#items'][0].value,
    "img": {
      "landscape": file_url(content.field_img['#items'].entity.uri.value)
    },
    "name": {
      "first": content.field_first_name['#items'][0].value,
      "middle": content.field_middle_name['#items'][0].value,
      "last": content.field_last_name['#items'][0].value
    },
    "position": content.field_position['#items'][0].value,
    "department": content.field_department['#items'][0].value,
    "email": content.field_email['#items'][0].value,
    "phone": content.field_phone['#items'][0].value,
    "excerpt": {
      "medium": content.field_bio['#items'][0].value
    }
  }
%}
Staff Grid Block
Build paragraph type in admin interface

Create .twig file
This file, paragraph--staff-grid-block.html.twig will go in your themes /template directory.
{% set paragraph = content.field_staff|without('#theme', '#title', '#label_display', '#view_mode', '#language', '#field_name', '#field_type', '#field_translatable', '#entity_type', '#bundle', '#object', '#items', '#formatter', '#is_multiple', '#cache', '#weight') %}
{% set staff = {} %}

{% for key, s in paragraph %}
  {% set staff = staff|merge(
      {
        (key): {
          'theme': "staff--" ~ s['#paragraph'].field_theme.value,
          'img': {
            'landscape': file_url(s['#paragraph'].field_image.entity.uri.value)
          },
          'name': {
            'first': s['#paragraph'].field_first_name.value,
            'middle': s['#paragraph'].field_middle_name.value,
            'last': s['#paragraph'].field_last_name.value
          },
          'position': s['#paragraph'].field_position.value,
          'department': s['#paragraph'].field_department.value,
          'email': s['#paragraph'].field_email.value,
          'phone': s['#paragraph'].field_phone.value,
          'excerpt': {
            'medium': s['#paragraph'].field_bio.value
          }
        }
      }
    )
  %}
{% endfor %}
{%
  include "@organisms/grids/staff-grid-block/staff-grid-block.twig" with {
    "staff": staff
  }
%}
How to use your awesome new paragraph types
Okay, so now go to Structure > Content Types > Basic page and add a field. You’ll be adding a Paragraph field. ‘Type of item to reference’ = Paragraph and ‘Allowed number of values’ = Unlimited. Save field settings. Scroll down to the Reference Type fieldset on this next page. Keep the Reference method as Default. Now you can select our Staff and Staff grid block paragraph types and click Save settings.
Now, if you go to the node edit form of any Basic page on your site (create a Basic page if you don’t have an existing one), you will see a Paragraph field that will let you either Add Staff or Add Staff Grid Block! Give it a shot and you will notice that the styles and markup are exactly what we created in Patternlab. Now you have an entire component that can be used anywhere in your Drupal site, and you have that same component documented in Patternlab, your living styleguide.
Conclusion
I hope that this post was helpful, and I hope that it will inspire many of you to look at Godbolt’s book. It was definitely a great, thorough resource and it introduced me to some new ideas.
I am not, exclusively, a front-end developer so if you are a front-end expert and you see a mistake, or something that could use clarification, in my post, please point it out in the comments. I am using this ‘architecture’, or at least many pieces of it, on a project now and even by revisiting it, I have already learned a lot compared to my first read through the book.
Sources
I did not use every one of these sources in my post obviously, but I have used all of these resources in some capacity and I wanted to generate a comprehensive set of front-end sources since this post was so expansive. Also, I just want to thank all of the people who kindly share knowledge!
UPDATE (01/17/17)
I made a mistake and listed Aleksi Peebles and John Albin on the same line. below you will find the updated, and accurate, sources. Thank you, Aleksi, for notifying me of my mistake.
Books (BK)
Credit: I am using the phrase ‘four pillars of front-end architecture’ from Micah Godbolt’s book below. Thank you for an awesome book!
Blog posts (BP)
- Abby Milberg, Responsive Image Configuration in Drupal 8
- Alban Bailly, Anatomy of a (terrific) Drupal 8 theme
- Alex Pott, Javascript Testing Comes to Drupal 8
- Amy Vaillancourt-Sals, Demystifying Content Rendering in Drupal 8 Twig Files
- Brad Frost, Atomic Web Design
- Brian Gervais, Template Inheritance in Drupal 8 with Twig extend
- Chris Free, Responsive Images in Drupal 8 Using “srcset”
- Dries Buytaert, A plan for media management in Drupal 8
- Evan Lovely, Pattern Lab: Taking Our Workflow from a Linear to Parallel Process
- Israel Morales, Twig Extensions and Views FTW in Drupal 8
- Ivan Zugec, Using Display Suite in Drupal 8: How to Customize Content Pages
- Ivan Zugec, Using Display Suite in Drupal 8: How to Use Display Suite Fields
- Joe Tower, Frontend Style Guide Miniseries: Part One: Introduction
- JSON API team, JSON API Module Alpha Release Announcement
- Mark Conroy, Things I Learned from the DrupalTwig Slack: Volume 1
- Mark Conroy, Things I Learned from the DrupalTwig Slack: Volume 2
- Mark Conroy, No Surprises - Using PatternLab to Build the Design Your Client Signed Off
- Mario Hernandez, Integrating Components with Drupal 8 - Part 1
- Mario Hernandez, Integrating Components with Drupal 8 - Part 2
- Mateu Aguiló Bosch, Modern decoupling is more performant
- Randy Oest, Frontend Style Guide Miniseries: Part Two: KSS Node
- Rikki Bochow, Building a layout system for Paragraphs
- Sally Young, Dynamically Inlining Critical CSS with Server-side Javascript
- Wes Ruvalcaba, Scaling CSS Components with BEM, REMs, & EMs
- Wes Ruvalcaba, BEM & Atomic Design: A CSS Architecture Worth Loving
Video tutorials (VT)
DrupalCon Dublin 2016 (DUB)
- Christina Chumillas, Improving the Responsive Web Design Process in 2016
- Dries Buytaert, Keynote
- Lauri Eskola, Drupal 8 Theming in Depth
- Mateu Aguiló Bosch, Advanced Web Services with JSON API
- Mateu Aguiló Bosch and Preston So, API-First Initiative
- MortenDK, 21 Things I Learned with Twig & Drupal
- Suzanne Dergacheva, Creating Layouts and Landing Pages for Drupal 8
DrupalCon New Orleans 2016 (NO)
- Christopher Bloom and Christopher Wright, Wireframes to Widgets: Using Paragraphs and Prototyping Tools to Create a Collaborative Design Process
- David Needham and Les Lim, Using Paragraphs to Weave a Beautiful Content Tapestry
- Gus Childs, Aha! Understanding and Using Render Arrays in Drupal 8
- Jeff Eaton, Recoupling: Bridging Design and Structured Content
- John Albin, Six Easy Pieces for the New Front-end Development
- Marc Drummond, Sizing up responsive images: Make a plan before you Drupal
- Saket Kumar, Exploring Drupal 8 Frontend landscape through Polymer
- Travis Tidwell and Randall Knutson, JSON Powered Forms in Drupal
BADCamp 2016 (BAD)
- Chaz Chumley, Streamlined Front-end Development with Pattern Lab and Twig
- Drew Bolles, Front-end performance and Drupal: Having your cake and taking a few bites
- Kathryn McClintock, The Right Tool for the Job: Content Layout in Drupal 8
- Kendall Totten, Reduce, Reuse, Recycle: Modular CSS for Enterprise Websites
- Mario Hernandez, Component-driven Drupal theming
Open-source Drupal 8 themes with PatternLab or KSS-Node integration (THE)
- Aleksi Peebles, Shila
- John Albin, Zen
- Forum One, gesso
- Four Kitchens, emulsify
- Phase 2, pattern-lab-starter
- Zivtech, Bear Skin (Pattern Lab Integrated)
Drupal modules (MOD)
Selected 8.x Change Records (CR)
- Accessing entities via REST no longer requires additional REST-specific permissions
- Add support for authorization in views REST
- Added a new URL formatter for image fields
- Added CKEditorPluginCssInterface: loading additional CSS in CKEditor iframe instances no longer requires hook_ckeditor_css_alter() to be implemented
- Anonymous users can register via REST
- Branding block used in place of page template branding variables (site name, slogan, site logo)
- Comments can be updated via REST
- Config entities readable via REST: GET support
- Creating new entities via REST now returns the created entity in the response
- Entities can now be linked to by their UUID
- New Twig function added to allow instantiating Attribute objects inside templates
- Outside-In is a new experimental module
- PHPTemplate has been removed from Drupal core
- The comment view mode can be configured in the formatter form
- Updating entities via REST now returns the updated entity in the response
- Upgrading 6.x themes to 7.x